
How To Find And Remove An Email Spam Script With Plesk 12
I am by no means an expert when it comes to web servers. I currently have a Virtual Private Server (VPS) which runs 10 websites on Plesk 12. It surely has been a steep learning curve getting to grips with running a server and one of my latest adventures has been spamming scripts which have flooded gmail accounts with spam resulting in my server being blacklisted. As a result, I can no longer send Gmail users emails from my server as they are all bounced and return the 550 undelivered error.
Unfortunately, whilst I was in the lonely place of figuring out how to solve my issue there was little to no help found on the web where anyone would help me for free. Now that I have solved my issues, here's a fully broken-down step-by-step tutorial on how to first find an email spam script on your server and then remove it.
NB: some email spam scripts are embedded in to files which are essential to keeping your website running. In my case, I was able to delete these files and rebuild them but you may need to check the function of each file before removing it.
How to locate and delete an email spam script from your web server using Plesk 12
This tutorial assume you are sure that your server is sending spam emails. Hopefully, you are familiar with the mail queue and other outbound mail features of Plesk - but if not, you should still be able to follow this tutorial and learn something along the way. Furthermore, this tutorial has been tested on Plesk 12.0.1. with a server running the default configurations for mail (Sendmail and Postfix).
Step 1: The first thing we need to do is limit the outgoing spam from our server. We can do this by logging in to our Plesk control panel as an administrator. This can be accessed by adding ':8443' to the end of your server's IP address.
Step 2: Once logged in, click on the Server tab at the top of the page and then Mail Server Settings. There's a lot of options on the Server tab so you may want to use CTRL+F to find the Mail Server Settings link.
Step 3: Now scroll down to Switch on limitations on outgoing email messages under the Settings tab and check the box to enable this feature. Set all the limits to a fairly low number, for example ten.
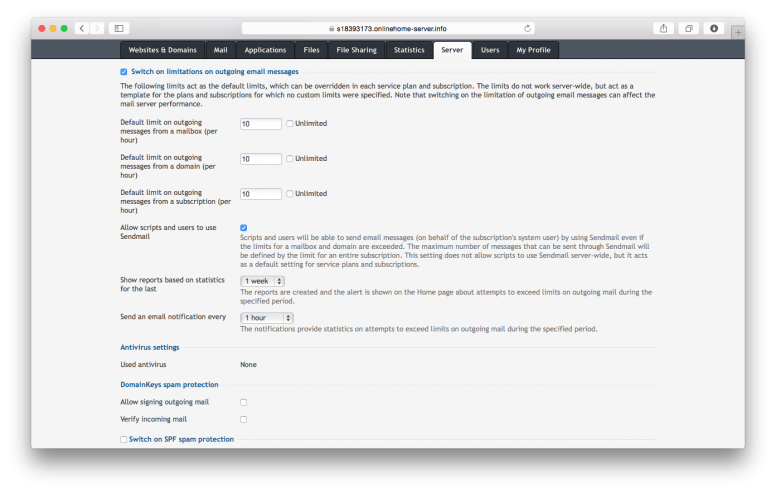
You may also want to check the box next to Allow scripts and users to use Sendmail.
Please note: Setting the limits to ten will mean you will only be able to send ten emails from each domain per hour whilst the setting is active. This includes spam emails and potentially any emails you try to send. If, like me, your server was sending thousands of emails a minute, you may find you cannot send any emails through your email address while this option is checked.
The option to Allow scripts and users to use Sendmail needs to be checked if you want mail to be sent from online contact forms, for example. Unchecking this option will stop 99% of all PHP-based spam scripts to stop working but it won't help us remove these spam scripts. It will also likely prevent any web application from sending emails.
Also, keep a note of this page. You may want to come back to it after this tutorial to restore back to the default settings.
Step 4: Now the email spam script is limited to ten emails an hour, we can get to work on finding where it is located. To do this, we are going to check the headers of the emails in our Mail Queue.
Click on the Mail Queue tab. You should hopefully see a list of emails waiting to be processed by the Server's mail system. In my case, I had over 6000 pages of emails. The subject column shows you the subject of the email, and you can use this to distinguish between spam emails and legitimate emails being sent by users on your server.
Step 5: Find a spam email, and click it's subject. This will open a new window containing the email header. Most of what you see should be self-explanatory. You should look for a line similar to the following:
X-PHP-Originating-Script: 10002:defines.php
This tells us that this particular email was sent by a file called defines.php. Unfortunately, I cannot find a way of displaying the entire path of the file - but there is still a way to find it.
Make a note of this file, and check some other email headers for the same line. If the originating script file varies, note them all down.
Step 6: Now, it's time to locate this file - and delete it! In my case, it was a file belonging to a Wordpress plugin, so I completely removed the plugin.
To do this, you need to access your server via SSH. Plesk Power panel will enable you to do this if your hosting provider has given you the privileges. You can access the Plesk Power panel by entering your IP in the address bar followed by ':4643'.
Alternatively, more advanced users can use an SSH application of their preference - for example Terminal.
Step 7:
Once you have logged in to the Plesk Power panel dashboard, click SSH Connection under Services in the navigation bar on the left. Login using the same details you used to log in to Plesk Power panel. You will need root privileges.
Step 8: Those who have previous experience with Terminal/Command-line interfaces may find this step easier. You want to navigate to the directory of your website(s). For me, I had to use the command 'cd ..' to go up a directory and then use 'cd var/www/vhosts' to get to the directory that contained all of my websites on the server. Since several of these were causing the spamming issue, i did step 9 at this point. If you know which domain is causing the issue, use the cd command to navigate to that directory to make the next step process faster.
Step 9: Now we are going to locate the PHP file sending the spam. Remember in Step 5 we made a list of all those .php files? Now it's time to locate them. Enter the following command in to the SSH window:
find . -name "default.php"
Replace default.php with the file you found in Step 5. Depending on how many files you have, this could take a while, but you should see a list of files appear along with their full location. Any one (or all!) of these files is causing the spam issue. Note them all down.
Step 10: Now use the File Manager in Plesk, or an FTP service of your choice to open and inspect all these files. If they're not important or seem unfamiliar, delete them. Otherwise you might need to rebuild them without the malicious code. If you complete this step correctly, your spamming issue should completely cease.
This tutorial should give you a very good insight in to finding spam scripts and deleting them. However, since every case is different, you will need to use some of your own experience and common sense to completely solve the issue. This tutorial is for guidance only - and may not completely solve individual spamming cases. If you continue to have issues, we suggest you contact a company called Computer Palm who provide computer help in London and may be able to solve your issue for you, or provide further guidance.

Thanks for reading!
My name is Zahid Mahmood, and I'm one of the founders of Anterior. I started this technology blog when I was in high school and grew it to over 100,000 readers before becoming occupied with other projects. I've recently started writing again and will be posting more frequently.