
Storing Complex Data As A WordPress Custom Field
WordPress custom fields are great for storing additional data related to a post or page. For example, you may want to store a 'rating' value on posts which are review articles. But what if you wanted to store more complex data? What if you wanted to store multiple values?
How to store complex data as a WordPress custom field
In this article we are going to walk through storing complex data in a custom field which is then rendered in a standard post. Using the code in this article, you can easily change it to render on a page, custom post type, taxonomy and whatever else is compatible at the time of reading! You may also rename the fields to make it work with whatever complex data you are trying to store. Remember, this is just an example to help illustrate the concept of what can be achieved.
In this example, we want to store an unlimited number of skills along with their rating. The idea behind this is that a single post will represent a user profile, and that each user will have 'skills' that need to be listed on their profile page. For example, a particular user will have the web development skills of HTML, CSS and JavaScript whereas another use will have Knitting and C# as their skills. This presents two problems which we will need to tackle: each post will have a varying number of skills, and these skills may be unique to each post/user-profile.
Storing data in a custom field
The first limitation we need to wrap our heads around is the fact that WordPress custom fields (by default) are text fields. That means anything we store will need to be text-based. We could engineer an elaborate loop which stores one skill per custom field - but I personally do not like this approach. It means that our custom fields will be scattered with potentially hundreds of fields which becomes messy and difficult to manage as your web application grows, and could also slow your website down as each page load will require more-than-necessary calls to the database to retrieve each custom field value. In addition, it would also mean that each skill would have (at least) two custom fields associated with it: the skill name and the skill rating.
So, we need to store complex data as a string.
Aha!
JSON.
Using JSON to store complex data
JavaScript Object Notation (JSON) is a unified way of representing data. I'm not an expert, but if you have worked with REST APIs you will know JSON very well. Some say it's an alternative to XML. JSON is certainly my preferred way of storing complex data in a single text field.
JSON, by nature, allows objects. Each object can have nested objects and arrays. And each object and/or array can contain objects, arrays, strings, booleans and/or integers. So basically, the fundamental variable types can all be stored within JSON without a hard limit on size.
Furthermore, the PHP json_encode() and json_decode() functions make it very easy to handle JSON objects. Since WordPress is built on PHP that means we can very easily work with WordPress' front-end and back-end when manipulating data stored in JSON.
Manually storing JSON in a custom field
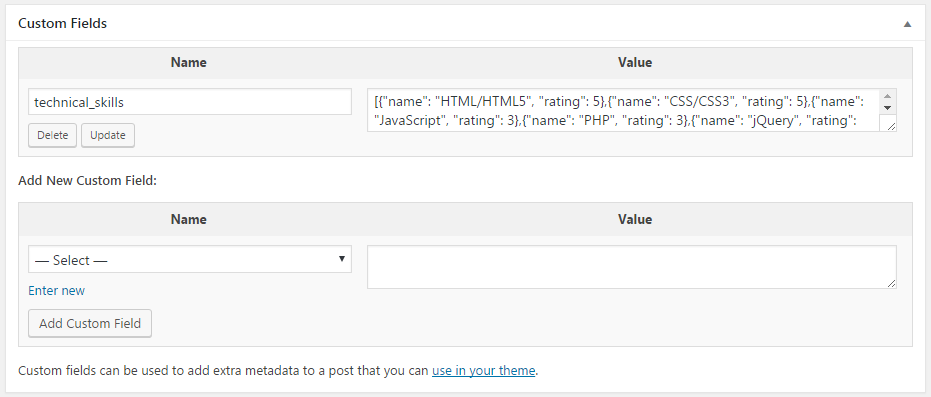
Okay, finally, some code. For the purpose of this guide we will create a highly inefficient and manual way of storing our complex data. From the post-editor screen scroll to the Custom Fields section and Add a new custom field. Give it the name technical_skills and paste the following JSON object in to the value field:
[{"name": "HTML/HTML5", "rating": 5},{"name": "CSS/CSS3", "rating": 5},{"name": "JavaScript", "rating": 3},{"name": "PHP", "rating": 3},{"name": "jQuery", "rating": 3},{"name": "WordPress", "rating": 4},{"name": "Java", "rating": 3},{"name": "AngularJS", "rating": 3},{"name": "C#", "rating": 1},{"name": "C", "rating": 2},{"name": "Gulp", "rating": 2},{"name": "Bower", "rating": 4},{"name": "Blockchain/Web3", "rating": 2},{"name": "Ionic", "rating":3},{"name": "MATLAB", "rating": 2},{"name":"Markup","rating":4}]
When formatted, the above JSON code represents an array which contains 17 skills. Each skill is an object within the array, and contains a name and rating value.
Save changes to your post, and next we will update the PHP template to display this data in a meaningful way.
Display JSON data from a custom field in a WordPress template
This part of the tutorial is a little more abstract. How you display the data, and where you display it is completely up to you. For reference purposes and to keep things simple, I will be printing the data on a single post page as a list. That means I will add the code to my single.php file, but if you want to render the custom field data on a page (page.php) or a custom post type you can do so. When rendered in the browser, it will look something like this:
HTML/HTML5 -> ***** CSS/CSS3 -> ***** JavaScript -> ***
I.e. I will display a list of skills along with a number of stars to represent the rating.
Below is the code I added to my single post template of my WordPress theme to achieve this. Later is a breakdown explaining the code:
<?php $skills = json_decode(get_post_meta($post

ID, 'technical\_skills', true)); foreach($skills as $skill) { echo $skill->name; echo " -> "; for($i=0; $i < $skill->rating; $i++) { echo "\\*"; } } ?>
If you have correctly added a custom field and added the above code in the right place of your WordPress theme, you should get a printed list of the 17 skills and their ratings which were copy and pasted in the single post editor page.
You can read more about custom fields and how to use them on the WordPress Codex:
The template code explained…
Here goes my attempt at explaining the code. It's really basic and should be self-explanatory. I'm not very technical with my explanations, but this should only help beginners get a functional understanding of what is being achieved…
$skills = json_decode(get_post_meta($post->ID, 'technical_skills', true));
The above line gets the value of the custom field using the get_post_meta() function. The only thing you need to worry about here is the string value you pass as the second argument. Ensure this matches the name you gave to your custom field on the post editor page. In my case it's technical_skills.
Once it retrieves this value, which as we know is a JSON object, we use the PHP json_decode() function to turn the JSON array and objects in to PHP arrays and objects. This makes it easier to do stuff with the data such as read values and loop through any arrays - which I'm sure you will agree is important for this exercise!
That decoded, PHP-friendly JSON object is now stored in the PHP $skills variable. The value we added to our custom field was a JSON array with 17 indexes/values. That means $skills is now a 17-index PHP array, which contains PHP objects in each index. Each PHP object stored in the array has two properties - similar to our JSON object - name and rating.
foreach($skills as $skill) {
We then start a foreach loop. If you are unsure about foreach loops, I would highly recommend you read up about them - the PHP manual is a good place to start.
In typical foreach-loop fashion, we represent each array element of $skills as a local variable called $skill.
echo $skill->name; echo " -> ";
In each iteration of our loop we print the name value of object/skill in the array using the PHP echo() function. We then also print a simple arrow.
If just this part of the code was selectively run, we would see something like the following printed to our browser screen:
HTML/HTML5 -> CSS/CSS3 -> JavaScript ->
So for those who have been paying attention thus far, you will note that the next bit of code must print the stars based on the rating value!
for($i=0; $i < $skill->rating; $i++) { echo "\*"; }
For the rating value we using a nested for-loop. It simply prints X asterisks where X is the value of the rating property. Nested for-loops are an important part of intermediate programming functions in all languages, so do ensure you read up on them if you feel uncomfortable at this point. If you just wanted to print the rating value, that would be as simple as replacing the code block above with echo $skill->rating;. Simples!
As far as the basics go, we are done. Next, you should focus on the user experience for the back-end. I would suggest building a simple plugin which adds a metabox to the post editor page for editing the values of the technical_skills custom field. Currently, the user can manually edit the JSON object through the custom field box in the post editor. Try it out! Change some values, or even remove an entire object from the array and experiment with how this changes what is printed to your single post.

Thanks for reading!
My name is Zahid Mahmood, and I'm one of the founders of Anterior. I started this technology blog when I was in high school and grew it to over 100,000 readers before becoming occupied with other projects. I've recently started writing again and will be posting more frequently.